Wednesday, April 30, 2008

More Senior Project

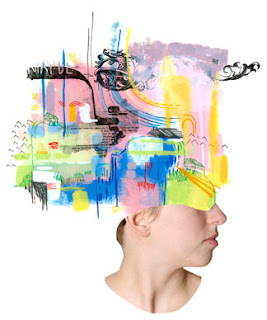
Just wanted to make a quick post! A recap of last Friday? Maybe. Real quick, real quick, another senior project image!!!


This is an illustration about Tourette Syndrome. I kind of imagined the condition as someone's brain being a full house. Too many thoughts and personalities colliding and irritating each other, resulting in tics and outbursts.

On to other things...

I thought the presentations went really well! It's nice to hear everyone talk about their work, especially since half the people that presented were from the other class and it was all new to me. I think we were all in our own worlds over the last few weeks too, so it was kind of cool to see all of the illustrators gathered in one room. It was a long day though, am I right? I'm looking forward to this Friday, but it's gonna' be rough.

I am also kind of curious to know what people thought of the posters and postcards we printed. I heard both good and bad things...

-Bill
billferenc.com

Friday, April 25, 2008

Lucy Swerdfeger


This is part of my series from Alice: Through the Broken Glass. Its a different take on Alice in Wonderland focusing on themes of finding oneself and enlightenment.

Tuesday, April 22, 2008

Small Endings

Here are a couple of images from Small Endings, a series of images created in conjunction with the novella that I wrote. 
Chocolate Milk, 6 by 12 inches
Hair, 8 by 10 inches


Sr Show

I thought I'd share a piece of my senior show here, but every one will get to see the whole thing on Friday. The image is pretty big, but thats because the original is 26x20 or something like that.


p.s.

hey guys...


I made a little website showcasing a few images from my senior project. Have a looksee!

p.s. we are so close! i can almost feel the gradumacation upon us.

Sarah Hedlund

My show is a series of illustrations depicting a circus fire that takes place during the dust bowl of the 1930's, I wanted to explore the themes of the American Dream and of our cultural landscape.


Monday, April 21, 2008

Aliems

Well I shall make my appearance on here with some aliems enjoy.

Just a Test

The following image was uploaded at 72 dpi, but is 10 inches wide!!!! The image below is merely a thumbnail, click it to open a larger version.


This is another image from my senior project. A photo illustration of Vision! I made four others, obviously for the other four senses. Maybe I'll post those later.

Upload an Image (edit)


Hi! Here is a sample of my senior project!

***So, I thought for some reason that blogger will crop your image if it's larger than 6 inches. Boy, was I wrong. When you upload an image, it will post it as a thumbnail! Then, when you click on the thumbnail version in the actual post, it opens up at its original size. Cool!

To add an image:

1.) Edit your image appropriately.
2.) Make sure you SAVE your file FOR WEB in photoshop as a .jpg at 72 dpi!
3.) When making your post, click on the little picture icon NEXT to the check spelling icon in the toolbar.


...then follow the instructions. I like to choose 'none' for the layout option, and medium for the size option (this will be the size of the thumbnail).

4.) After it's uploaded, the image will always appear at the top of the text box. You can click and drag the image to the place you want it to appear in the post.

5.) After you finish your post. Make sure to add your name in the labels section (like Molly mentioned) and click "publish post".

6.) You should be done!

...I hope I didn't confuse anyone!

***Blogger does NOT take any sort of ownership over your images. But you can include a little copyright symbol on your image somewhere if you like.....

>>>Bill - billferenc.com

Monday, April 14, 2008

Molly Butterfoss

technology

hey guys...if we tag our posts with our own names it will create an archive on the side, so when someone clicks on those names they will see all of our posts/images. i think bill needs to do the settings to make sure that labels will show up on the side... this is what blogger says about getting labels to show up:
  1. Go to the Template | Page Elements tab, or just click the Layout link on your Dashboard.
  2. Click the Edit link on the "Blog Posts" widget.
  3. In the configuration window, you'll see an option to display the labels with each post. You can change the text used for this if you like, but the most important part is to have this option checked.
  4. Save your changes, and view your blog to see your labels.

OR we can just each do a post with a bunch of our images and title it with our own names, that way it will show up in the topics column and people can click on our names to see our work.